Molasses Ginger Cookies

These are one of my favorite types of cookies – chewy-soft and melt-in-your-mouth. I received a mixed batch of cookies from a friend for Christmas and these were included. I know they’re simple but oh my, they are my absolute favorite. Yum! Of course I had to ask for the recipe after he gave me the cookies 😀

What can I say? Sometimes you can’t beat a classic. I tend to create smaller-than-teaspoon sized balls for my cookies as I like knowing I can have just one (or two or three…) and not feel super guilty.

Molasses Ginger Cookies

Adapted from Betty Crocker. Yields about 4 – 6 dozen, depending on cookie size.

Printable Recipe

Ingredients:

  • 1 cup packed brown sugar
  • 3/4 cup butter (original recipe calls for shortening, which I don’t like; use what you prefer)
  • 1/4 cup molasses
  • 1 large egg
  • 2 1/4 cups unbleached all-purpose flour
  • 2 tsp. baking soda
  • 1 tsp. ground cinnamon
  • 1 tsp. ground ginger
  • 1/2 tsp. ground cloves
  • 1/4 tsp. salt
  • Granulated sugar, for coating cookies, in a small mixing bowl

Method:

  1. Line a baking sheet with parchment paper or lightly grease. Place a baking rack in the middle of the oven and preheat to 375°.
  2. In the bowl of a stand mixer, beat brown sugar, butter, molasses, and egg, until well combined.
  3. Mix in flour, baking soda, spices, and salt until incorporated.
  4. Roll dough in teaspoon-sized balls (or smaller, if you want mini cookies). Roll the balls in granulated sugar and place on the prepared baking sheet, about 2-3 inches apart (depending on the size of your cookie balls).
  5. Bake for 8-12 minutes (less time for smaller and/or softer cookies and more for larger and/or chewier cookies), until just set in the middle.
  6. Immediately remove from baking sheet to cooling rack.

Mini Chocolate Chip Cream Scones, for two

In case it’s not obvious, I love mini treats. I love being able to eat something and barely feel the guilt as it passes my lips. These scones are just mildly sweet – a little hot spot of warm gooey chocolate in a flaky delicious dough. One of my top 3 favorite desserts. And they can be eaten as breakfast, so even better!

I could make these scones every single day and eat them all. And they disappear so easily… I don’t know HOW that happens. Maybe we have scone-stealing house elves. Fortunately, this recipe makes just 12 2-bite scones. Perfect for 2 or 3 people. Or 1 person over 2 days. Or 1 person and 2 house elves. Whatever works for you.

These are a delicate confection with a soft-crisp exterior. Very similar to handmade biscuits – the small pieces of cold butter are what create the flaky, air-pockety qualities in scones. Much like in croissants, I imagine. Whereas, in cookies, the butter is softened before being added and creates a different texture entirely.

They’re best warm from the oven and the quality quickly goes downhill if you eat them even the next day. Good warm but, as Hermit learned (0r I guess, didn’t learn) with chocolate chip cookies, when someone (his sister) says “Careful, they’re hot”, and when you feel  melty chocolate  burning your hand,  DON’T pop the cookie in your mouth as a way to stop it burning your hand. ❀

And the best thing, if you want to make these for a crowd, the recipe easily doubles or triples. Work people devoured these when I tripled the recipe one morning. I want to try making them dairy free (for Hermit) although I don’t have much experience baking with margarine vs. butter.

What are your favorite desserts? If you’re reading this, leave a comment and let me know what you think 🙂

Mini Chocolate Chip Cream Scones

Printable Recipe

Adapted from Small-Batch Baking; makes 1 dozen mini, 2-bite scones

Ingredients:

  • 1 cup unbleached all-purpose flour
  • 2 tbsp. granulated sugar
  • 1 tsp. baking powder
  • 1/4 tsp. salt
  • 5 tbsp. butter, cut into 1/2-inch cubes
  • 1/4 c. mini chocolate chips (regular will work too, but not as well. Plus, the minis are so cute!)
  • 1/4 cup half-and-half
  • 1 egg yolk
  • approx. 2 tsp. additional granulated or large-grain/raw sugar, for sprinkling (optional)

Method:

1. Place rack in middle and preheat oven to 375°; grease a small/medium baking sheet or line with parchment paper.

2. In a medium bowl, whisk together the flour, 2 tbsp. sugar, baking powder, and salt.

3. Using a pastry blender, two butter knives, or your fingertips, cut the butter cubes into the dry ingredients until the butter pieces are no bigger than peas.

4. Stir in chocolate chips.

5. With a fork, mix half-and-half and egg yolk into mixture until just combined.

6. Turn out dough onto a floured surface and knead 5-6 times, just until a ball has formed. Be careful not to over-mix or over-knead.

7. Using a sharp knife or a dough cutter/lifter, cut the dough in half. Lightly flour your hands and gently pat each ball into a disc about 1/2-inch in height. Cut each disc in half and then each half into thirds. You’ll have 6 roughly-equal wedges/scones from each disc.

8. Carefully transfer the scones to prepared baking sheet, spacing equally apart; at least 1-inch between scones.

9. Bake in preheated oven for 13 – 14 minutes, or until the bottoms are golden and the tops have just barely started to become golden.

10. Remove scones to a cooling rack. Let cool 5 minutes and enjoy immediately – be careful, the chocolate is piping hot. Best served fresh.

11. To serve again (warm), pre-heat oven to 350°, wrap the scones loosely in aluminum foil and heat on a baking sheet for about 5 minutes. The outside should crisp up and taste almost as good as the first day.

Gingerbread Macarons, Two Ways

A few weeks ago, Hermit and I tried some (French) macarons from a local bakery. I had a Groupon ($5 for 10, sweet). They weren’t very good, which is sad for a bakery that only does cupcakes and macarons. Yech!

Anyway… I figured maybe it was just that bakery; I’ve read so many good things about how good macarons are. I figured, why not try baking some for myself? What could it hurt?

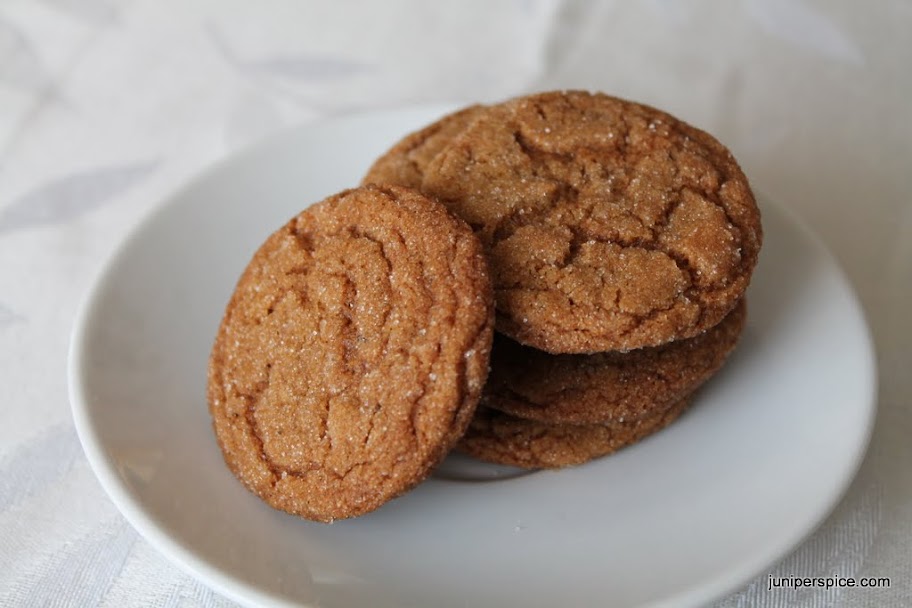
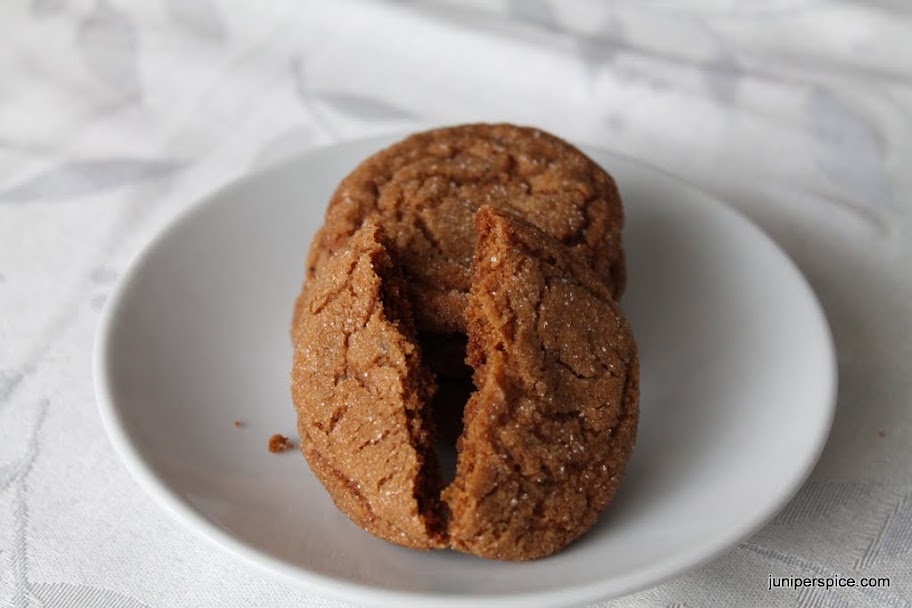
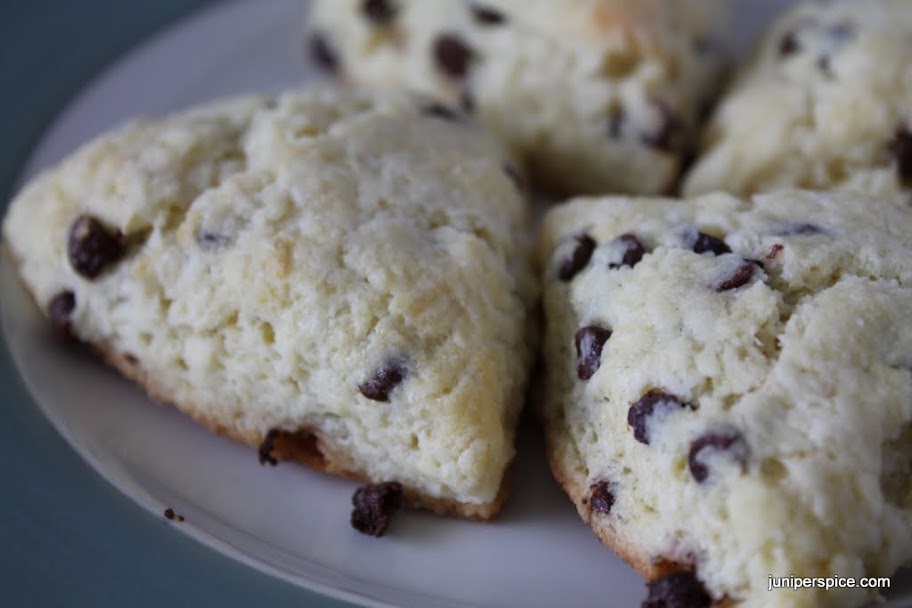
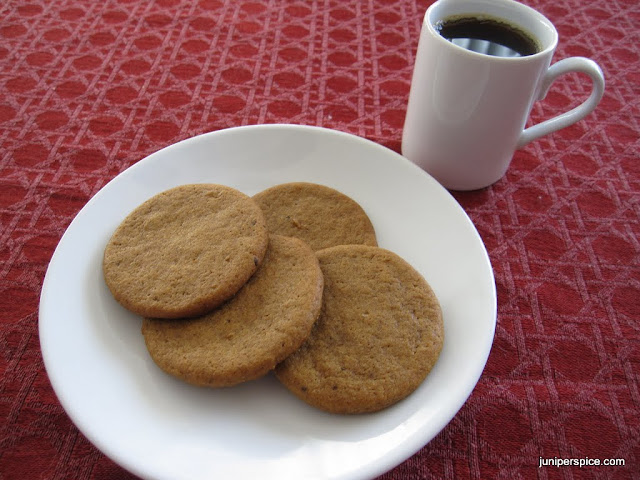
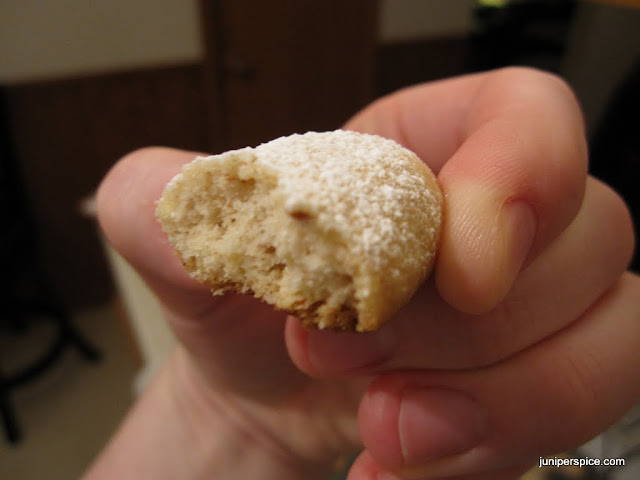
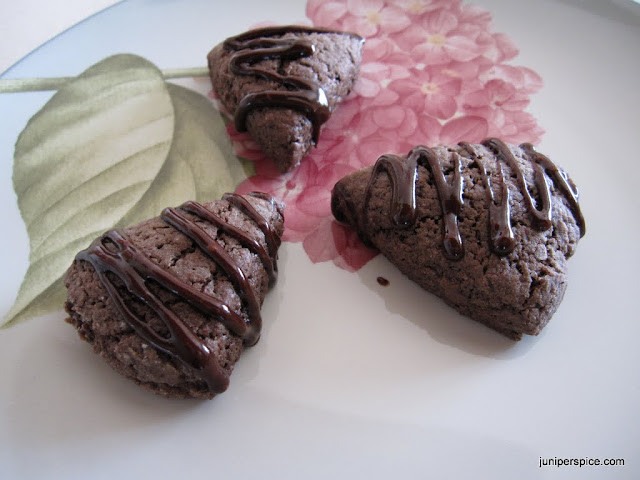
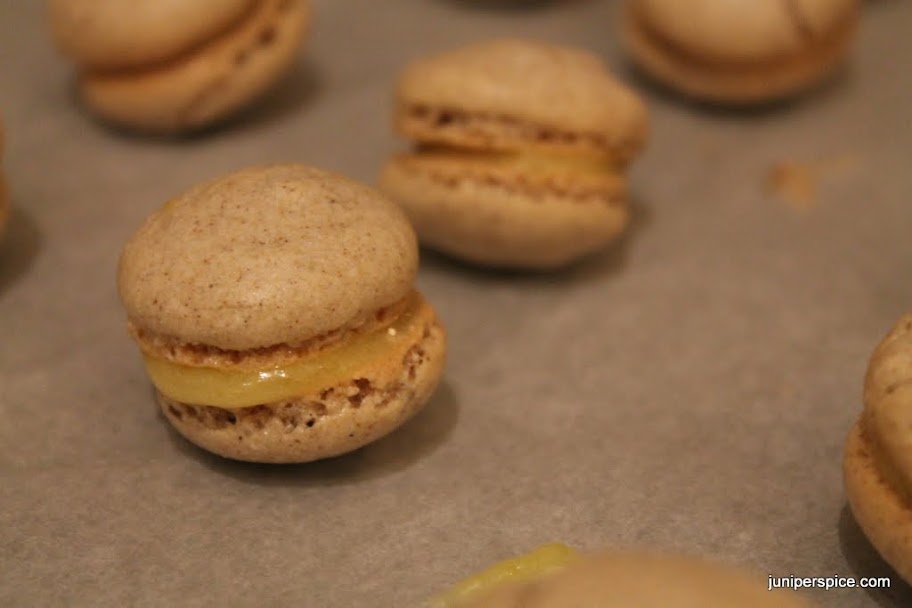
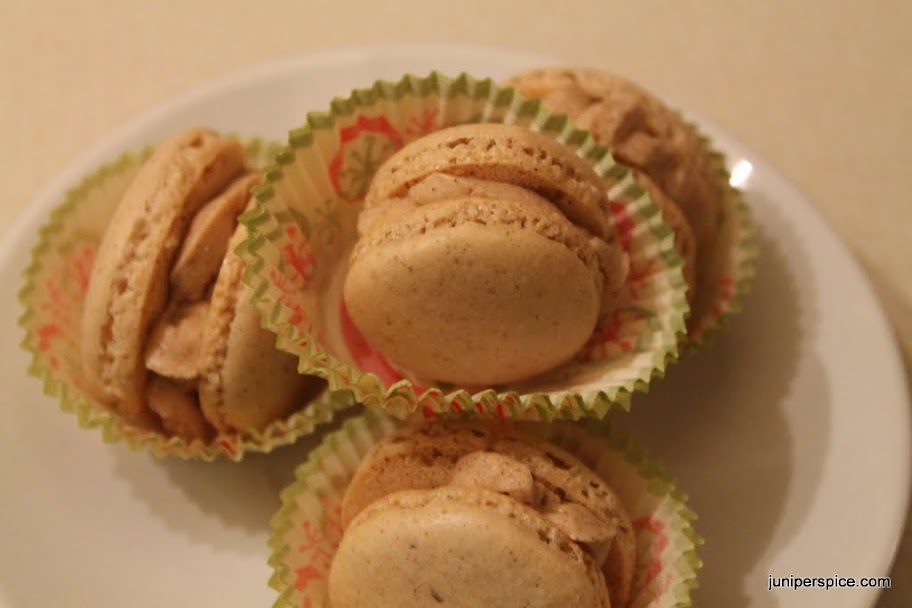
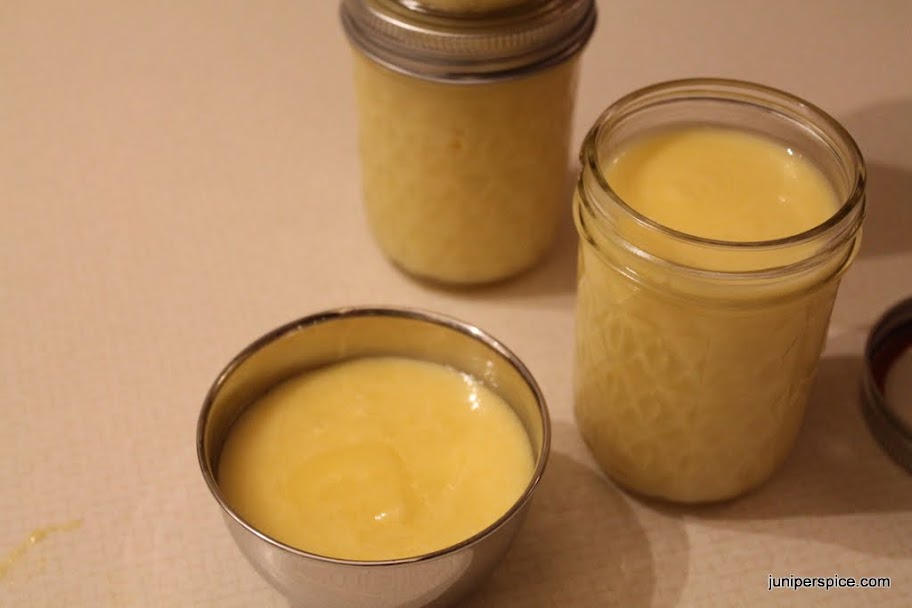
I am so glad I didn’t give up on macarons! When made correctly (?) (tastily? fresh?) they’re delicious. The recipe I borrowed  was paired with a lemon-ginger type buttercream. Which, while this sounded fantastic, I wanted to try a zingier lemon. So I made this lemon curd recipe. Why lemon curd? I have no idea. I can’t even recall ever eating lemon curd on it’s own, didn’t really know what it looked like, or how it tasted. Oh, it’s a zingy, sweet, thick mass of deliciousness. The macarons with lemon curd were a little unstable right away. After setting them up, I let them rest in the fridge overnight and the curd became thicker and held the cookies together nicely.

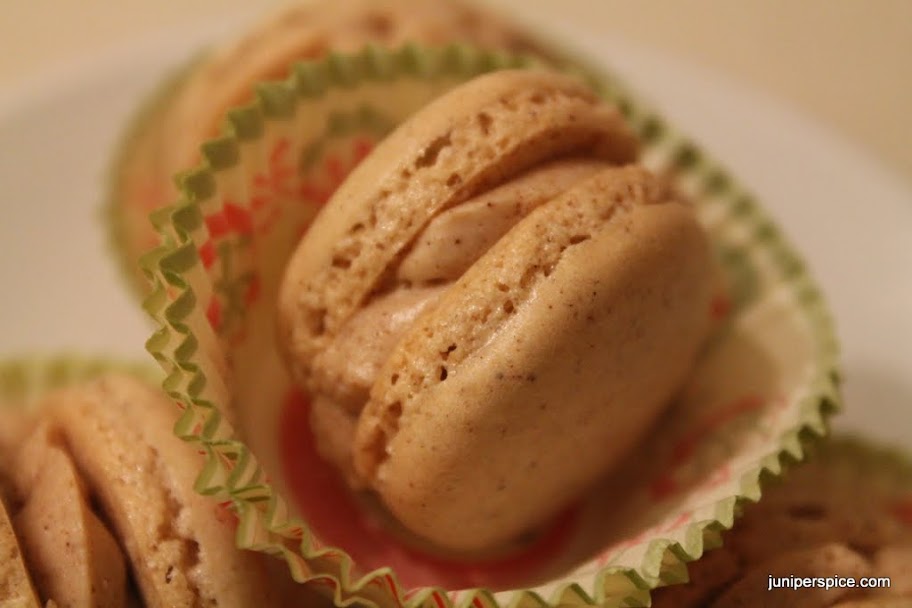
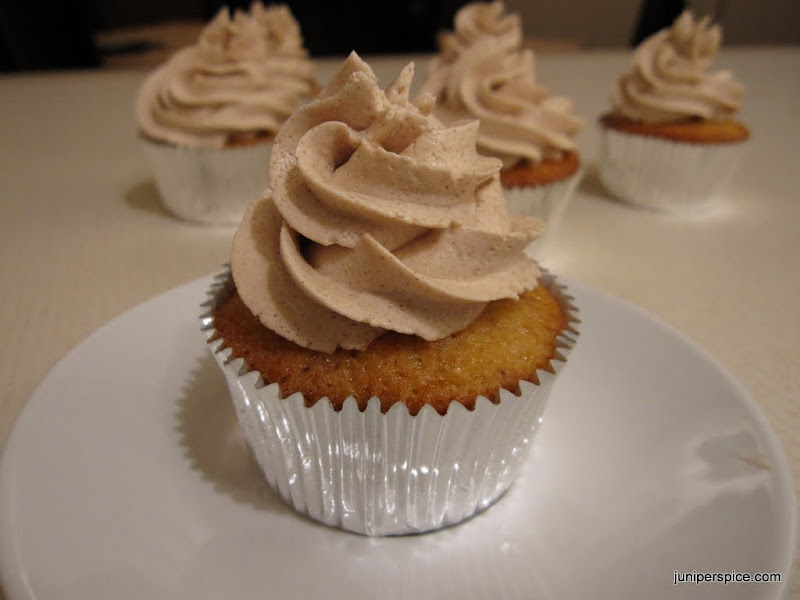
Then I made these cupcakes and had some Rum Buttercream frosting left over. So I put frosting on part of the macarons and lemon curd on the rest. They were both great – each in their own way. The rum buttercream is made with meringue and egg nog and reduced rum, so it pairs nicely with the gingerbread macarons. But the flavors are also very similar.

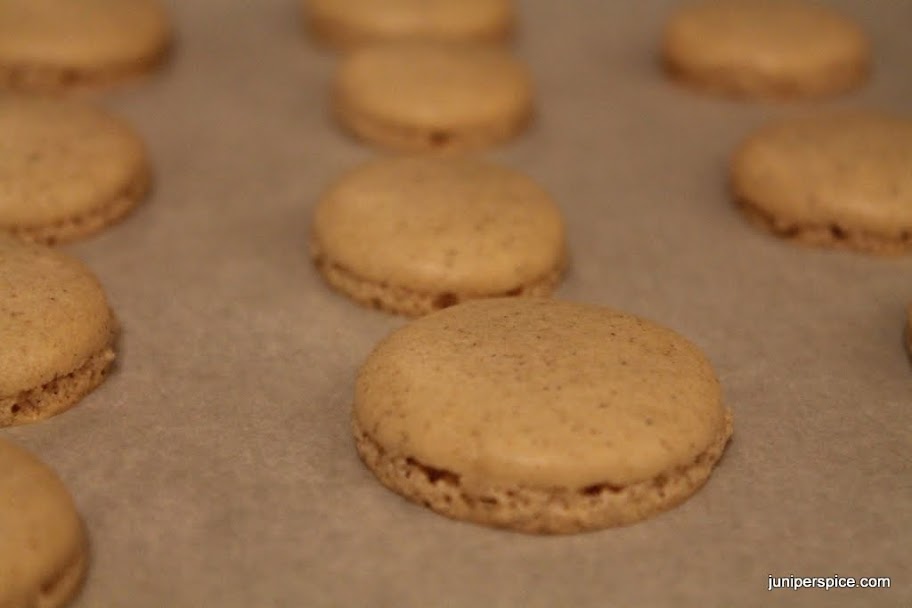
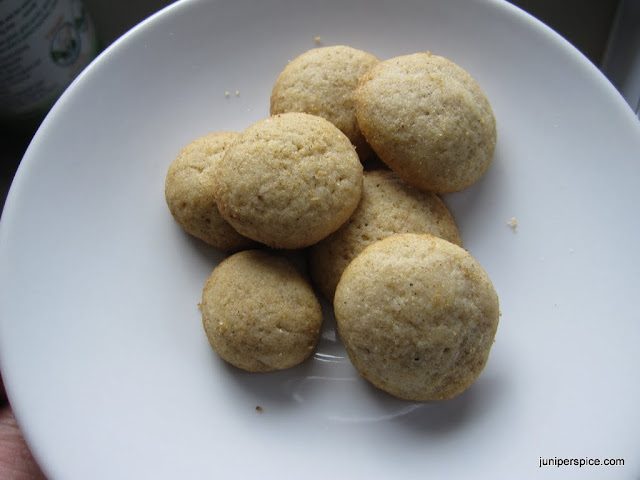
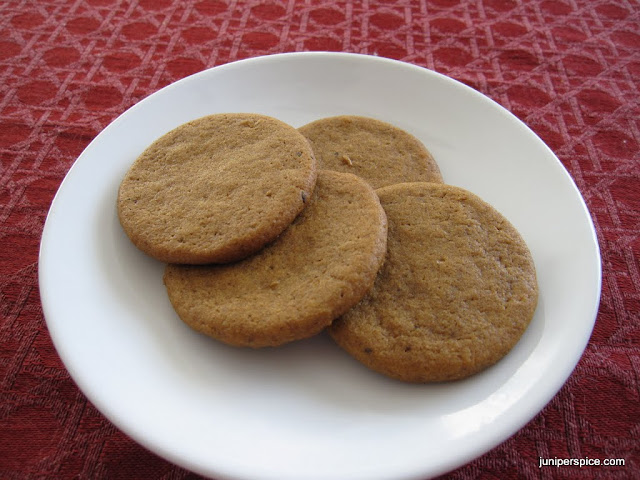
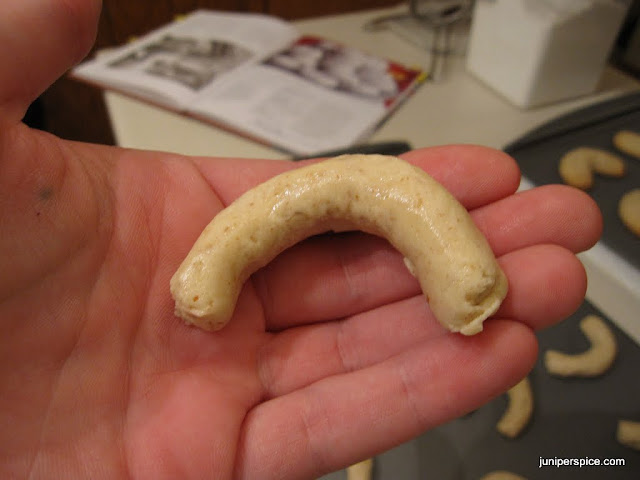
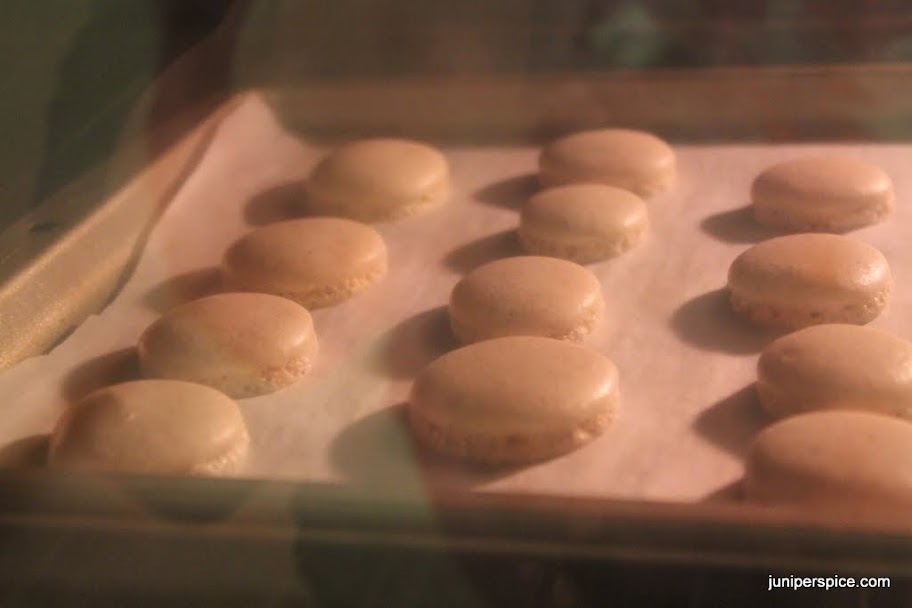
Macarons are the bane of many bakers’ existence – they can be super finicky and impossible to master. Half of mine didn’t rise appropriately, didn’t get the characteristic ‘feet’ on the bottom, and cracked somewhat on top. Meh, they still tasted fantastic. If you don’t own a kitchen scale, invest in one. You can get a decent scale for $20 or so. It’s worth it in this recipe because you want your measurements to be exact with macarons.

I”m looking at some blueberry macarons next… we’ll see. I just found freeze-dried blueberries (no sugar added) at Trader Joes.

Gingerbread Macarons with Rum Buttercream -or- Lemon Curd

Gingerbread Macarons

Source: Anne’s Food

Printable Recipe

Ingredients

  • 3 egg whites, or 90g, aged*
  • 2 tbsp. granulated sugar
  • 200g powdered sugar
  • 110g almond meal/flour**
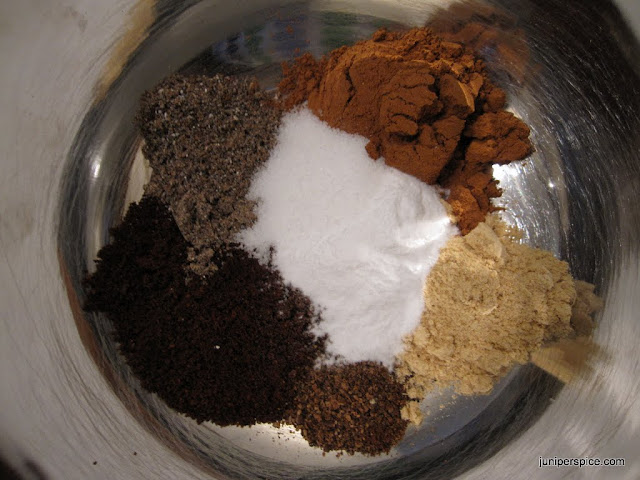
  • 1 tsp. each ground cinnamon, ginger, cardamom

* The egg whites need to lose a little moisture so they’ll bake properly. At least the night before, or up to 5 days before you make macarons, put the egg whites in a bowl in the fridge (outside of the shell), with a loose paper towel on top. You can also leave them out on the counter overnight with a paper towel covering, to help them age quicker.

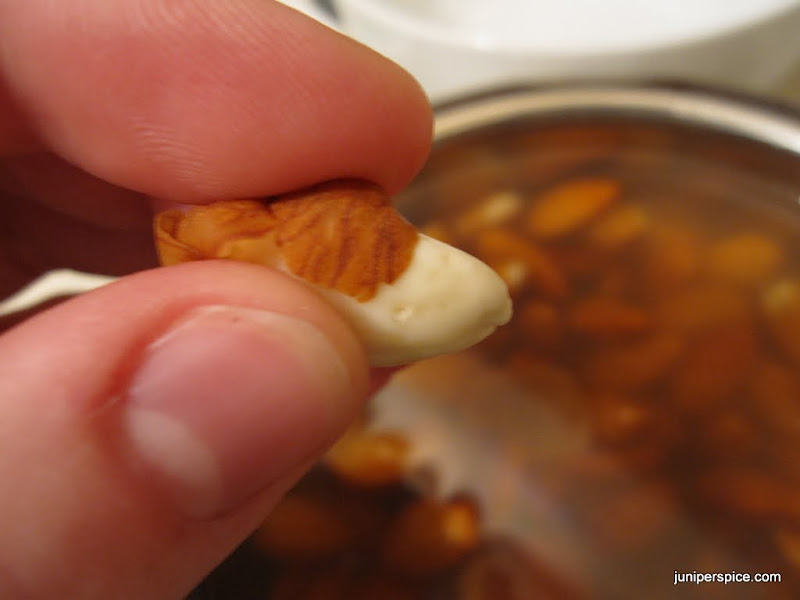
** Almond meal is expensive. I used natural/raw almonds (I like these because they don’t process peanuts or other tree nuts in their factory, which is important for family allergy reasons. And they’re reasonably priced –  Target frequently has 16-oz. bags on sale). Put the almonds in a wide bowl, pour boiling water to cover the top of the almonds, and let sit for 1 – 2 minutes. Drain the water and rinse briefly in cold water. Pour out onto a towel on a baking sheet and partially dry. The skins should slide off with a little pressure.

Method

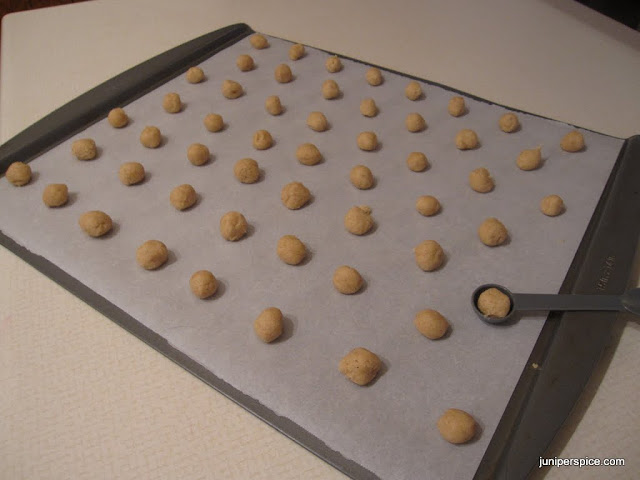
1. Line 2 baking sheets with parchment paper and set aside.

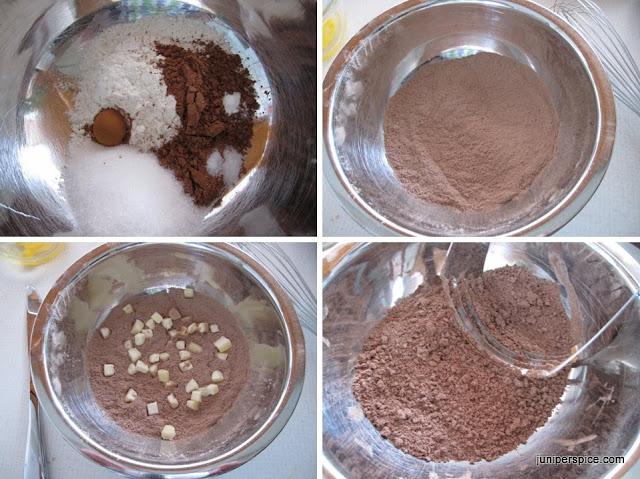
2. Mix together powdered sugar, almond meal, and spices. Whisk well and then sift together. The almond pieces may be bigger than than the holes in the sieve so you’ll have to whisk again after sifting.

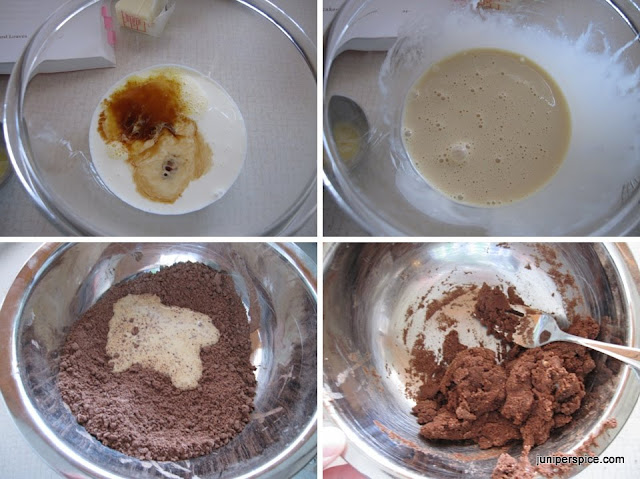
3. Prepare the bowl and whisk attachment of a stand mixer by wiping each with a little lemon juice or white vinegar. If there’s any leftover oil from your hands or something else you made in there before, the egg whites won’t form the peaks like you need.

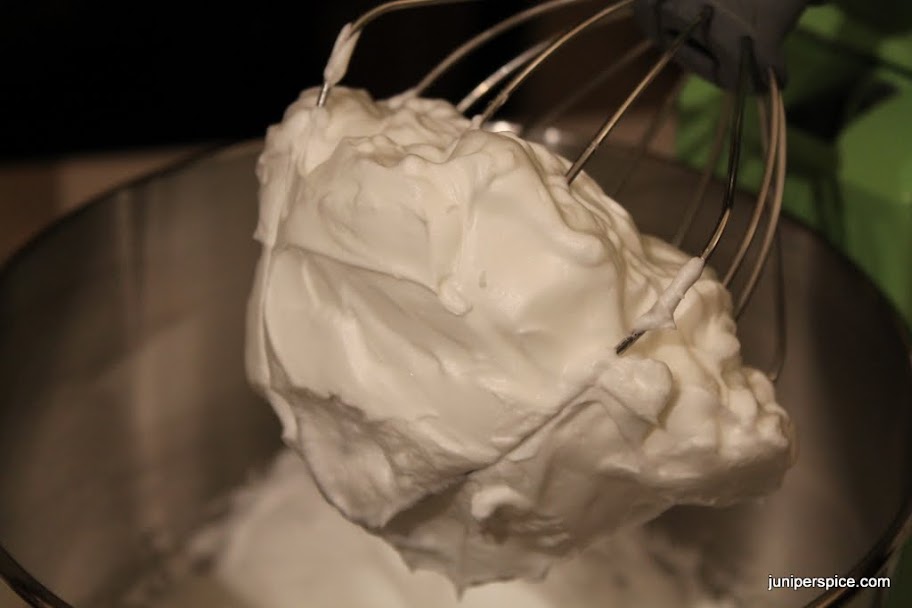
4. Combine the aged egg whites and granulated sugar in the prepared bowl. Beat on medium until you have a thick, glossy meringue (think: shaving cream-ish).

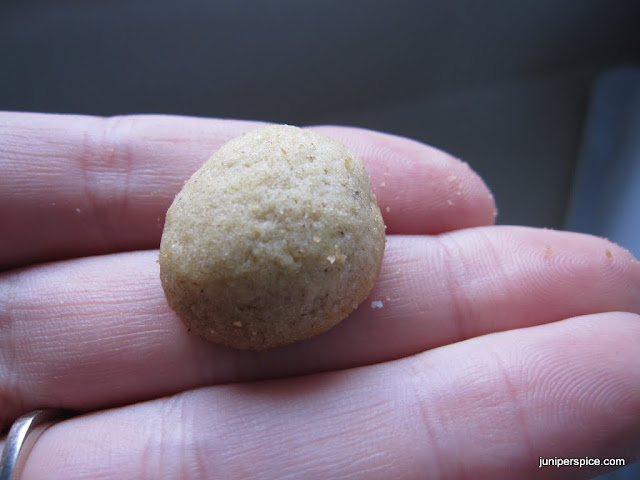
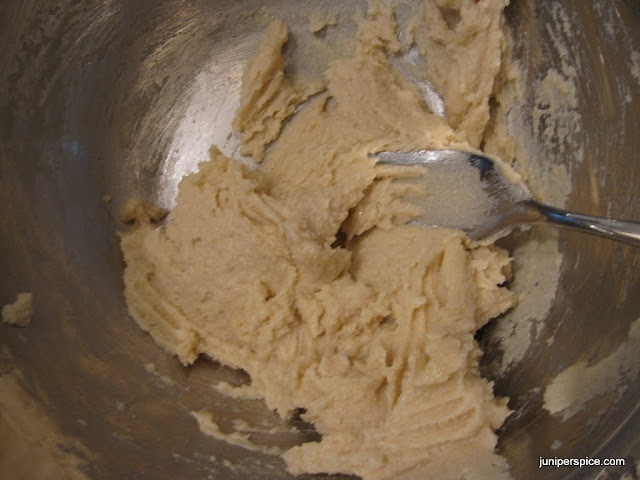
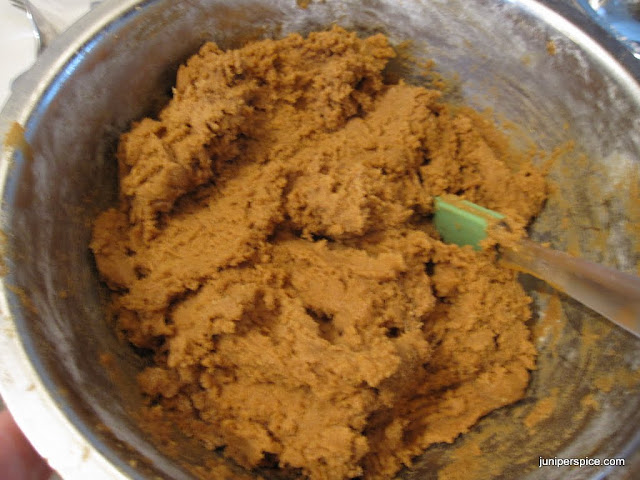
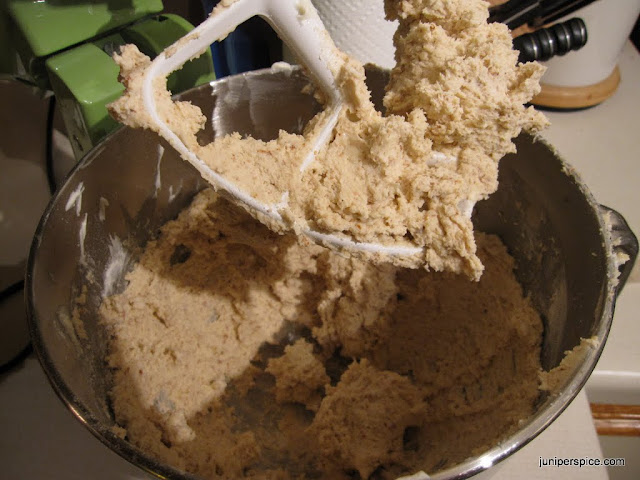
5. Remove the bowl from the mixer. Add the almond mixture to the bowl and carefully fold into the meringue. Make sure to count your folds and do not do more than 45 or 50. I’m usually around  40 – at about this point, drop a little on the prepared baking sheet – if the top folds over on itself, the batter is ready to pipe.

6. Fill a pastry bag, fitted with a large round tip, or a gallon ziploc bag (cut the corner off after filling) with the dough. It’s going to leak out of the end when you’re filling. Remedy this by either holding the bag closed with a hair pin just above the tip, or use some other device.

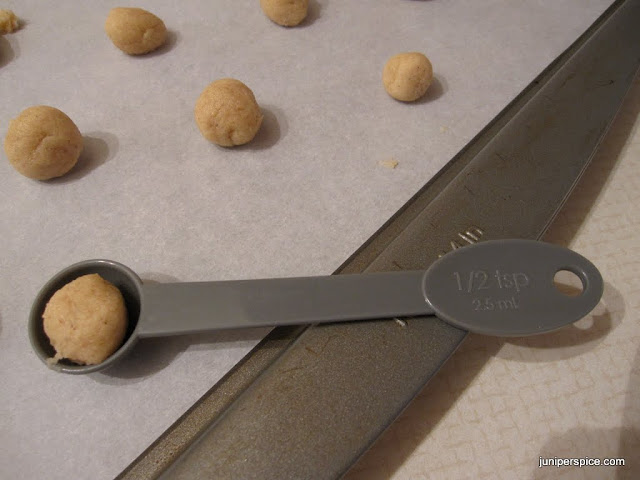
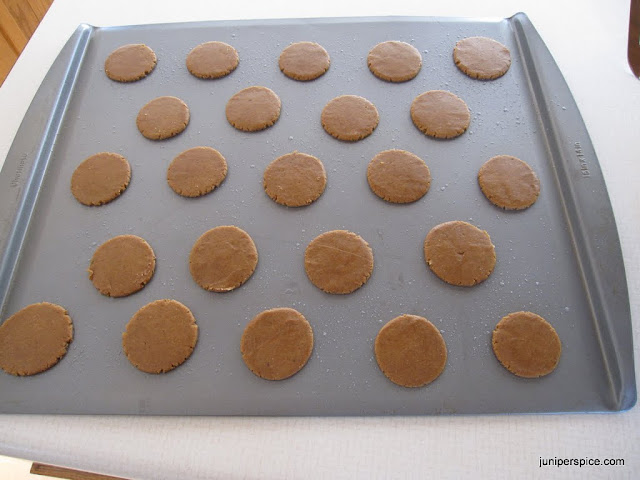
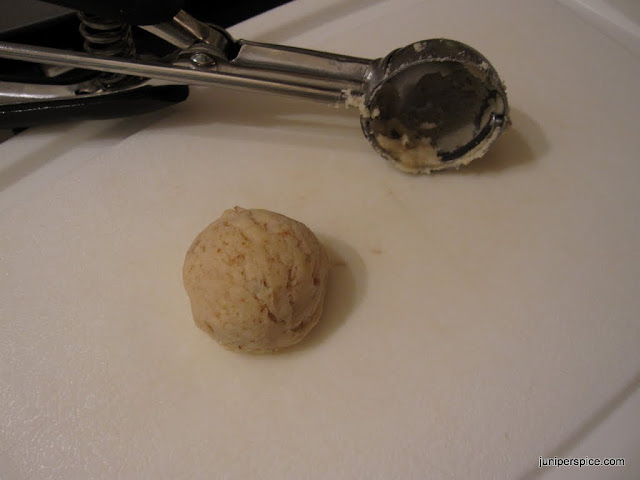
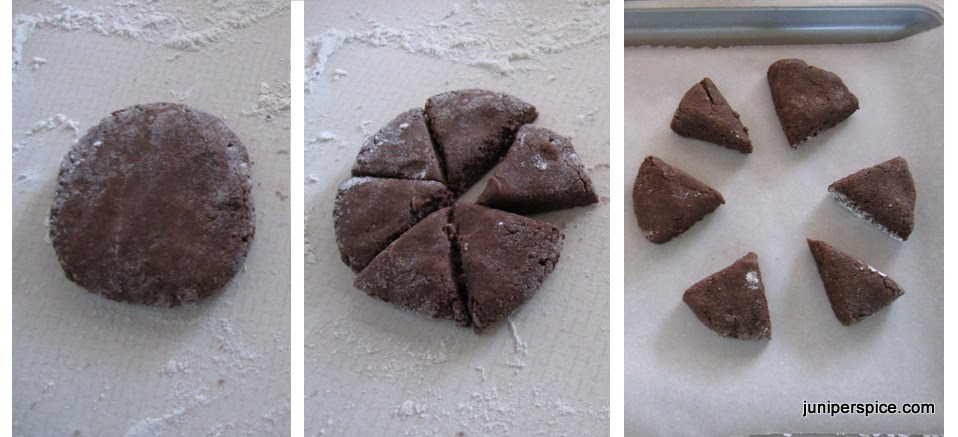
7. Holding the pasty bag completely vertical, pipe 1 1/2″ circles on the baking sheet, about 1 1/2″ apart. Set the baking sheet aside for about 45 minutes, to allow the macarons to form a skin on top of the cookies. (I wait 15 minutes before piping the macarons onto the second sheet, as it will sit on the counter an extra 15 minutes while the first batch bakes).

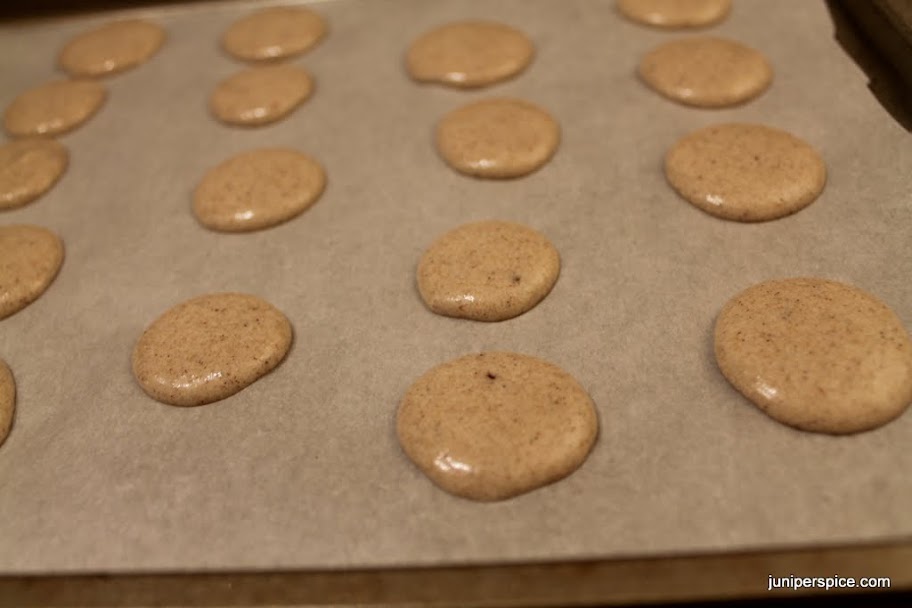
8. Bake in a 280° oven for 14 – 16 minutes. If you’ve done everything ‘right’, the cookies should get ‘feet’ about 6-8 minutes into the baking. This is the little, rough-looking layer at the bottom of the cookie – mine aren’t perfect but they still taste wonderful. The cookies are done when the tops are dry to the touch and can be removed from the baking sheet with just slight pressure. (Pick an ‘ugly’ macaron to test this out on, in case it’s not done, you’ll destroy the cookie – better to ruin an ugly one).

9. Remove the cookie tray to a cooling rack. Let the macarons cool completely on the baking sheet.

10. Once cool, ‘pair up’ cookies with similar sized cookies. Flip over one of each pair, and pipe your choice of filling, below, on the upside-down half. Carefully pair up the halves – they can easily crack if you press down with too much pressure.

Rum Buttercream

Source: Savory Simple’s Eggnog cupcake recipe

Printable Recipe

Ingredients

  • 2 cups spiced rum
  • 3 egg whites
  • 8 oz sugar
  • 1/4 cup water
  • 1 tsp light corn syrup
  • 1 1/2 cups (2 1/2 sticks) butter, room temp and cut into small pieces
  • 2 tsp cinnamon
  • 1 tsp vanilla
  • 1/4 cup eggnog (optional)

Method

1. Add the spiced rum to a small saucepan. Heat until boiling over high heat. BE CAREFUL and watch closely – rum is very flamable. You might accidentally set the rum on fire (flambĂ©) – carefully remove the pan from heat and put the lid over the top for a few seconds. Once extinguished, return to the stove top.  Cook until you have 3-4 tbsp. of liquid. Cool completely.

2. Here you have to be coordinated – it helps to have your mixer near your stove, if possible. In a medium saucepan, combine the sugar, water, and corn syrup. Attach a candy thermometer to the side of the pan. Over high heat, boil the mixture until it hits ‘soft ball’ stage, or 235 – 240°.

3. While the sugar mixture is coming to temperature, add the egg whites to your stand mixer (make sure your bowl and whisk attachment are grease-free by wiping down with lemon juice/vinegar). On medium/medium-low speed, whip your egg whites to a soft peak. (Ideally, you want the sugar temperature to hit 235° at the same time your eggs hit a soft peak.)

4. With the mixer on high speed, carefully, slowly, pour the sugar mixture into the mixer bowl. Try and hit the very edge of the egg whites with the stream of sugar without hitting the beater. Whip on high speed until the mixture is room temperature and you have stiff peaks. Wrapping your mixer bowl with ice packs will speed up this process.

5. Slowly add the butter, once piece at a time until all incorporated. Add the egg nog, cinnamon, vanilla, and cooled rum. Beat until well mixed and the frosting has a smooth texture. (Sometimes I switch to the beater attachment to create a smooth texture here.)

Lemon Curd

Source: Ina Garten

Printable Recipe

Ingredients

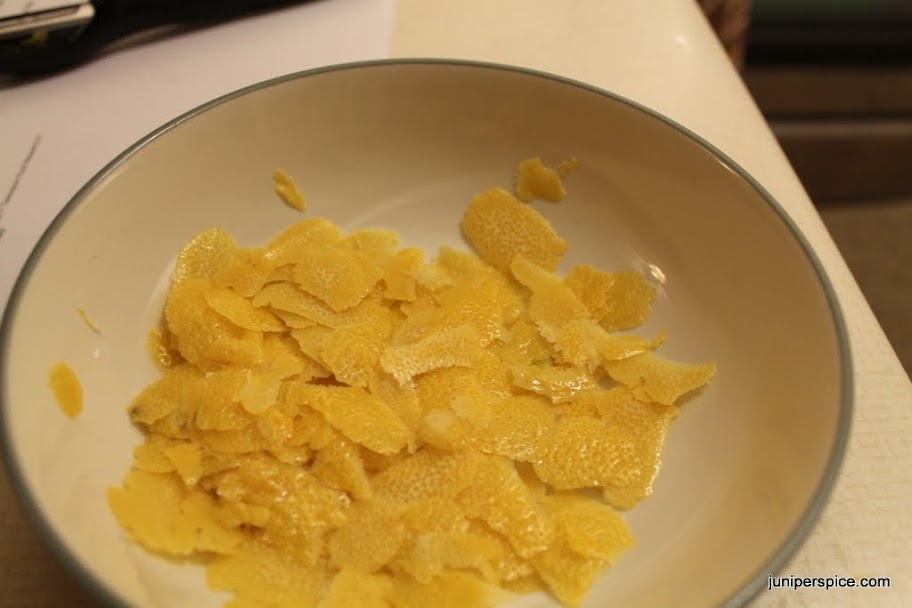
  • Peel of 3 lemons (peel with a carrot peeler, avoiding the white pith part)
  • 1 1/2 cups granulated sugar
  • 1 stick (1/2 cup) unsalted butter, at room temperature
  • Juice of 3 lemons, about 3/4 cups (leave at room temperature to get more juice)
  • 1/8 tsp (kosher) salt

Method

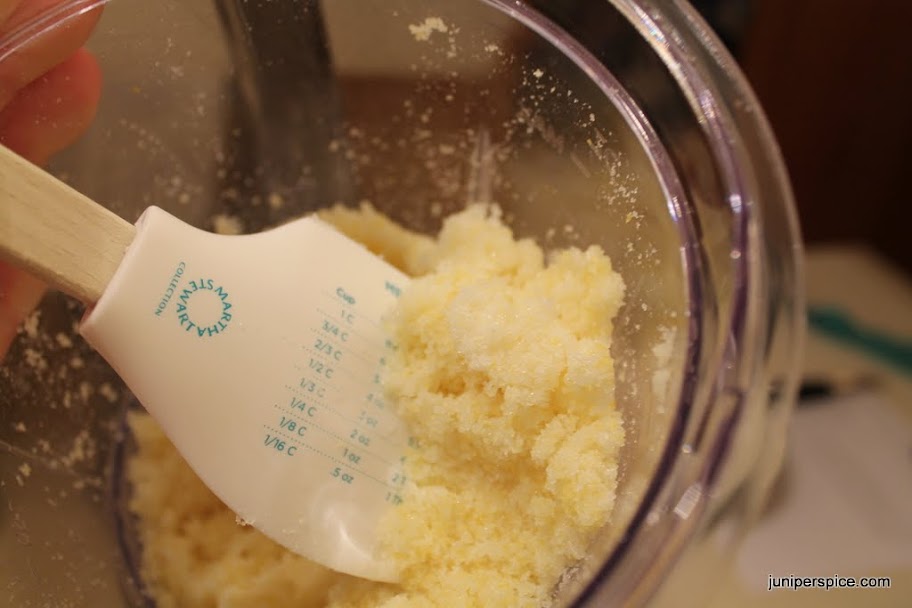
1. Put the lemon peel and sugar in the bowl of a food processor. Pulse until you have a fine zest incorporated into the sugar.


2. In the bowl of a food processor, cream the butter with the lemon sugar mixture. Once combined, add the eggs one at a time. Once incorporated, add the lemon juice and salt and process until smooth.

3. Pour the mixture into a 2 quart saucepan and heat over low heat until thickened, about 10 minutes, stirring constantly. If you have a candy thermometer, the mixture will be just around 170° when it thickens. Remove from the heat and cool or refrigerate.

Pebernodder (Danish Peppernut) Cookies

These are another of my favorite cookies this time of year. They’re light and crisp, a little spice and buttery; I’m told they have that umami “savory” quality. They have all of those ‘exotic’ spices that go into all sorts of baking this time of year – cardamom, cinnamon, nutmeg – yum!

These are teeny-tiny rolled cookies. I have been hunting for a 1/2-teaspoon or even 1-teaspoon cookie or other scoop but no luck. So, for now it’s all hand rolling. It’s time consuming but it’s totally worth it not only for the cuteness factor – the small size is the perfect complement to this cookie’s taste.

The full batch will yield about 250 – 350 bite-sized cookies, depending how small you roll the dough. I had about 60 cookies on a sheet (14.5 x 15.5 inch baking sheet) and 5 or 6 batches at least. I lost count after all that… o.O

These cookies can be dangerous. You can easily grab handfuls and eat a couple dozen before you realize it. Whoops? Worth it.

Pebernodder

adapted slightly from All Recipes.

Makes ~ 250 – 350, depending on cookie size.

Printable Recipe

Ingredients:

  • 1 cup (2 sticks) butter, softened
  • 1 cup sugar
  • 2 eggs
  • 1 tsp. cardamom, ground
  • 1 tsp. cinnamon, ground
  • 1/2 tsp. nutmeg, ground
  • 1/4 tsp.  white pepper, ground
  • 1 tsp. salt
  • 2 tsp. baking soda
  • 2 3/4 cups all-purpose flour, or as needed

Method:

1. Preheat oven to 350°. Line 2 to 3 baking sheets with parchment paper or grease lightly.

2. In a mixing bowl, beat together butter and sugar until light and fluffy. Mix eggs in one at a time, until well combined. Add cardamom, cinnamon, nutmeg, and white pepper until blended.

3. In a medium bowl, whisk together flour, salt, and baking soda. Add flour mixture to butter mixture, one cup at a time, until dough comes together.

4. Pinch small, 1/2-tsp. amounts of dough and roll into tiny balls. If you have it, use a round, 1/2-tsp. measuring spoon for reference. Place on prepared baking sheets, about 1 1/2″ apart.

5. Bake in preheated oven until bottom of cookies browns slightly, about 8-10 minutes. Remove and let cookies cool on baking sheet for 10 minutes. Remove to cooling rack to finish cooling. Store in an airtight container.

Iced Lemon Butter Cookies

I love baking with lemon. And I love lemon cookies. I was in girl scouts when I was younger and I hated selling the cookies (I was always shy and hated going door-to-door selling anything). But I loved getting to buy and eat them! My absolute favorite – especially since they’re discontinued now and I find myself craving them (*sadface*)- were the Lemon Pastry Cremes. Oh they were so good! Zingy lemon filling between two crispy, airy ‘pastry’ cookies. Soooo good! The rest of the cookies pale in comparison.

I made these cookies last year as one of the Christmas cookies to give away. It was a great success I believe. 🙂

The recipe is adapted from the Joy of Cooking, Fourteen in One (Master Recipe). Technically this is a rolled cookie but, if you read my Pepparkakor post you’ll know – I don’t have a good relationship with rolling cookie dough. I’m working on it. 😛 (In fact, I just read Bakergirl’s post about Cut-Out Sugar Cookies and it looks like I may have a shot with this recipe and am tempted to try… we shall see)

It may be a little more time intensive to roll each cookie, cover with parchment paper, and flatten with the bottom of a glass, but it works well for me. As I’ve done this with other recipes before, and it’s even listed in this recipe as an ‘alternate’ to rolling, I don’t feel so bad about this. It works well and I find it maybe a little easier to control the thickness of each cookie – so they all bake evenly.

Iced Lemon Butter Cookies

Printable Version

Cookie ingredients:

  • 1 cup (2 sticks) unsalted butter, at room temperature
  • 1 cup superfine granulated sugar (process regular sugar in a food processor for 30 seconds)
  • 1/2 tsp. salt
  • 1 large egg yoke
  • 1 large egg
  • 2 tsp. vanilla
  • 2 1/2 cups unbleached all-purpose flour
  • The zest of one lemon – about 1 tbsp. zest
  • 1 tsp. fresh lemon juice

Icing ingredients:

  • 3 cups powdered sugar, sifted gently into the measuring cup and leveled with the back of a butter knife (like you measure flour)
  • 6 tbsp. fresh lemon juice (approximately 2 tbsp. for each cup of sugar)

Method:

1. Make sure all your ingredients are at room temperature (specifically, the butter and eggs) before you start. This recipe needs to rest for at least an hour before rolling the dough. I usually make it the night before and let it sit overnight.

2. Beat the butter, sugar, and salt in the bowl of a stand mixer until fluffy, light, and well blended.

3. Add the egg yoke and beat until well blended. Add the whole egg and vanilla and beat well.

4. Reduce the speed to low and mix in the flour until just combined. Don’t over-mix the dough.

5. Place two large pieces of plastic wrap or wax paper on the counter; divide the dough evenly between the sheets. Flatten the dough and form a disc shape of each, covering completely in plastic wrap. Refrigerate until firm, at least an hour, or overnight.

6. Preheat the oven to 350° and make sure one of your oven rack is in the top 1/3 of the oven. Cover 2 baking sheets with parchment paper or grease well.

7. Work with 1/4 of the dough at a time (half of one disc), leaving the rest in the refrigerator. Roll teaspoon-sized balls and place them on the cookie sheet, about 2 inches apart. Using another piece of parchment, cover the dough balls loosely and press down evenly and slowly on the dough. You want the cookies to be about 1/8″ thick, but any thinner and they will stick to the parchment paper. (You can also roll the dough to about 1/8 inch thick, sprinkling the dough lightly with flour to prevent sticking, as necessary. Cut using ~ 2 – 2 1/2″ cookie cutters, loosening with a fine-edged spatula if necessary).

8. Bake for about 6 – 7 minutes, or until just faintly golden. The cookies will quickly go from golden to brown. This will change the flavor and they’re better when the cookies are lighter in color.

9. Immediately transfer the cookies to racks to cool. I like to grab kitty-corner edges of the parchment paper and gently transfer the whole batch to a cooling rack. I find this helps to avoid broken, smooshed, etc. cookies as they’re not quite firm when they’re just out of the oven.

10. Once the cookies are cooled, mix the powdered sugar and lemon juice together until the icing is a spreading/piping consistency. I like my icing a little thicker; add more sugar or lemon juice depending on how thick/thin you want the icing. Using a zip-top bag (probably a quart or gallon sized), fill about halfway with the icing (any more and it may push over the top of the bag and spill out), close the bag and gather the icing into one corner, twist the top of the bag a little to keep the icing in the bottom corner. Carefully snip of a tiny corner of the bag and decorate cookies however you want. Or, use a spatula or knife to spread the icing evenly over the top. I like using a disposable pastry bag and a teeny-tiny piping tip as it’s less likely to spew all over the place like a bag will sometimes.

If you make these, I hope you enjoy them. I find these cookies to be a nice, refreshing alternative to some of the heavy, dense cookies you find on cookie trays this time of year. Oh, and I had leftover Pepparkakor and leftover lemon icing, so I combined them… the flavor is wonderful as well!

How about you – what’s your favorite Christmas cookie? Favorite Girl Scout cookie? It’s almost time for them again… 🙂

Pepparkakor (Swedish Gingersnaps)

No that’s not a giant cookie, it’s a mini espresso cup! The cookies are only about 2″ across. This is my second attempt at new Christmas cookie recipes for the year. I think they turned out great and I got top props from Hermit – he couldn’t stop eating them :D.

One day while I was at work – bored out of my mind – I stumbled across a Scandinavian cookie baking class. While I recognized the value of the class, I didn’t think it would be worth $75 for me to attend. Instead, I took note of some of the unfamiliar cookies and utilized Sir Google to help me out. While searching for Pepparkakor, I stumbled upon the blog Anne’s Food, a cooking/baking blog from Anne, who lives in Stockholm, Sweden.

I know you can buy these cookies at Ikea and they’re good – I’ve tried them. But I wanted to see if I could duplicate the crisp, semi-spicy, sweetness of these cookies.

The recipe I found was for “at least 10 dozen cookies” – which was way too much for my first batch. So, I broke out the kitchen scale – everything was in grams instead of cups, etc. – which is always fun to measure sugar and flour, etc.

Pepparkakor, adapted from Anne’s Food

Printable Recipe

This dough should sit in the fridge at least overnight – if not for a week or more – to age the spices in the dough. For this recipe, I let half the dough sit for 24 hours and the rest for a week, as a test.

Yield: 5 dozen cookies (halved from original recipe)

  • 1 tbsp. ground cinnamon
  • 1/2 tbsp. ground ginger
  • 1/2 tbsp ground cloves
  • 1/2 tsp. ground cardamom
  • 1/4 tsp. ground allspice
  • 1/2 tsp. salt
  • 1/2 tbsp. baking soda
  • 11 tbsp. unsalted butter, softened
  • 125 grams white sugar (~ a little less than 2/3 cups)
  • 75 grams brown sugar (~ 1/3 cup + 1 1/2 tbsp.)
  • 1/2 small egg (~2 tbsp. mixed egg)
  • the zest of half a lemon (~ 1 1/2 tbsp.)
  • 150 ml light molasses (~5 liquid oz.)
  • 150 ml heavy cream (~5 liquid oz.)
  • 550 grams all-purpose flour (~ 4 1/3 cups, sifted + about 1 tbsp.)

Day One:

1. In a small bowl, whisk together the spices, salt, and baking soda. In medium bowl, measure out flour, add spice mixture, and whisk together.


2. In a large bowl, cream together butter and sugars until fluffy and well mixed. Add the egg and mix thoroughly.


3. Add the lemon zest, molasses, and cream to the butter mixture and beat until well combined.

4. Add the flour mixture to the wet ingredients and mix well. The dough will be fairly sticky at this point.


5. Divide the dough evenly into 4 parts. Create disk shapes and wrap well in wax paper. Chill at least overnight or up to a week or two, to age the spices.

Day Two:

As with all traditional recipes for gingersnaps, you can roll out the dough (with either lots of flour or between 2 sheets of parchment or waxed paper) and use cookie cutters to create your shapes. Or, if you’re like me, and you suck at rolling cookies and feel like tearing your hair out at the thought, you can easily make circular cookies this way.

1. Preheat oven to 350°. Remove one disk of dough from the refrigerator at a time. Line your cookie sheet with parchment paper or grease well.

2. Using a 1 tsp. measuring spoon – or eyeballing it – cut off a chunk of dough. You want the cookies to be almost the same size as each other and the same thickness so they all bake evenly and none are burnt before the others are done.


3. You can do this one cookie at a time or you can measure out your cookies/dough balls all at once. The cookies should be about 1- to 1 1/2″ apart on the tray; the dough balls should be placed ~ 2″ apart.

4. Place the dough on the cookie tray, lay a piece of waxed or parchment paper over the dough, and press down firmly with a flat bottomed glass or other implement. You want to make sure and press evenly on all sides of the glass so your cookie is the same thickness throughout. Press down until the cookie is about 1/8″ thick.


5. Bake in the oven for 6 – 7 minutes. Mine were done right around 6 1/2 minutes. You don’t want the bottom to start browning or the cookies take on more of a burnt taste.

6. They’ll be a little soft when you remove them from the oven. Let the cookies cool on the tray for 30 seconds or so and then transfer to a rack. This is where parchment paper is wonderful – you can just (carefully) move the entire piece of parchment to a cooling rack and don’t have to worry about ruining your cookie shapes by using a spatula.

Also, these made a great base for a gingersnap crust. Unfortunately, I didn’t take pictures of the end result – Banana Cream Pie. *sadface*


Viennese Crescents

It’s that time of year again. Narrowing down the Christmas cookie list!

I am always way too optimistic with the number of new recipes I’ll be able to test. I always run out of time before I get to them all. Oh well, I’m a perpetual optimist 😀

One of my favorites cookie/desert cookbooks is the Joy of Cooking All About Cookies cookbook. There aren’t any recipes in here that you can’t find in the Joy of Cooking, but a good 75% of those in this supplement have big glossy pictures. Always helpful in finding a new recipe. (I also have the All About Vegetarian, which is another good resource when you want to have a good look at what you’re about to make.)

I wasn’t quite positive how these would turn out – they have only 5 ingredients. They were a big hit though, especially with Hermit. I thought they tasted similar to Russian Teacakes – which have walnuts chunks and are rolled in powdered sugar after baking – and are some of my favorite holiday cookies.

The only nuts I bake with are almonds, and only those which haven’t come in contact with other peanuts/tree nuts. Hermit’s niece is highly allergic to peanuts and it wouldn’t do to risk accidentally contaminating something. Thankfully, with a little creativity, I’ve found many cookies which don’t call for nuts. Last year, I actually made Peanut Blossoms with Soy butter instead of peanut butter. They turned out pretty well. I’d like to try this with an almond butter as well.

I love how soft-crunchy these were. I might try making smaller – i.e. not crescent shaped – round cookies from this recipe to see how they turn out. I love a bite-sized cookie. 🙂

Viennese Crescents

Printable Recipe
  • 1/2 pound (2 sticks) unsalted butter, softened
  • 3/4 cup powdered sugar
  • 2 tsp. vanilla extract
  • 1 cup ground blanched almonds* (or ground walnuts)
  • 2 cups all-purpose flour
  • 2/3 cup powdered sugar, for dusting

Instructions:

1. Place a rack in the upper 1/3 of the oven and preheat to 350°. Grease cookie sheet or line with parchment paper and set aside.

2. In the bowl of a stand-mixer, beat butter until pale and creamy. Sift powdered sugar over the top and beat until well combined.

3. Stir in vanilla extract and ground almonds. Gradually – gently – incorporate flour until all combined.

4. Remove bowl from mixer stand. If necessary, knead dough slightly until well blended.

5. Pull off chunks about 2 tsp. in size and roll gently into a compact ball. I have a (very handy) 2 tsp.-sized cookie scoop that works great.

6. Shape ball into a log and then curve slightly into a crescent shape. Place on prepared pans, 1 1/4 inches apart.

7. Bake one sheet at a time, about 10-12 minutes, flipping the cookie sheet halfway through baking. Take the cookies out when they’re very slightly browned. They taste better when they’re lighter in color.

8. Let the cookies rest on the cookie sheet until slightly firm. Remove to racks to cool.

9. Sift/dust powdered sugar over cookies while still slightly warm. Once cooled, store in an airtight container.

Bite-Sized Cinnamon Chocolate Scones

I seriously love these things. They’re one bite of crumbly, chocolaty, soft perfection. Yum! I’m kind of addicted to baking mini portions. Just a little addicted (heh, get it? mini, little…). Scones, pies, cookies, cakes
 yup, addicted to mini versions of all of those.

These little guys are adapted from Small-Batch Baking for Chocolate Lovers. I love these Small-Batch Baking books – you can eat an entire recipe (or share with your husband, if you do that sort of thing…) and not feel horrible. Also, it helps not having multiple dozens of something sitting around the house.

The original recipe is for 3 regular-sized scones. I made 12 bite-sized scones because they’re so much prettier and delicate. And because I can.

I hear people either like cinnamon with chocolate or they don’t. Hermit said they were ‘dry’ tasting because of the cinnamon. I loved them though. It adds another dimension of flavor I think.

Bite-Sized Cinnamon Chocolate Scones

Printable Recipe

Scones:

  • 1/2 cup all-purpose flour
  • 2 tbsp. sugar
  • 2 tbsp. unsweetened cocoa powder
  • 1/2 tsp. ground cinnamon
  • 1/8 tsp. baking soda
  • 1/8 tsp. salt
  • 2  tbsp. cold unsalted butter, diced
  • 1 tbsp. well-beaten egg (note: There are about 4 tbsp, or ÂŒ cup, in one beaten egg)
  • 2 tbsp. heavy (whipping) cream
  • 1/2 tsp. pure vanilla extract
  • Coarse sugar, to sprinkle on the tops (optional)

Cinnamon Chocolate Glaze:

  • 3 tbsp. semisweet chocolate chips
  • 2 tsp. unsalted butter
  • 2 tsp. hot water
  • 1 tbsp. powdered sugar
  • 1/8 tsp. ground cinnamon

Making the scones:

1. Preheat oven to 375°, place rack in middle of oven. Cover a small baking sheet with parchment paper or grease well. Set aside.

2. In the bowl of a food processor, pulse a few times: flour, sugar, cocoa powder, cinnamon, baking soda, and salt. (My food processor bowl was in the dishwasher so I did this the old-fashioned way. If you also don’t have a food processor handy, you can whisk the ingredients in a medium bowl.)

3. Add the butter pieces and pulse until coarse-looking crumbs form. (… Or incorporate with a pastry blender or two knives. )

4. Place the mixture in a medium bowl and create a well in the center.

5. In a small bowl, whisk together the egg, cream, and vanilla until blended. Add the egg mixture to the dry ingredients. Gently mix with a fork just until combined – you do not want to over mix. Your mixture should still look a bit “crumbly”.

6. Lightly flour a work surface and your hands; form two equal-sized balls with the dough. Place the dough balls on the floured surface and gently form two discs 1/2- to 3/4-inches in height. With a butter knife or pastry chopper, cut your discs in half and then in thirds, so you have 6 equal pieces.

7. If desired, sprinkle the scones with coarse sugar. With a sharp-edged spatula, gently transfer the scones to the prepared pan and space evenly. Bake the scones until they feel dry and a toothpick inserted in the center comes out clean, about 9-11 minutes.

Making the Chocolate Glaze:

1. Add the chocolate chips and butter pieces to a small, microwave-safe bowl; microwave 30-45 seconds on 50% power, until soft but not melted entirely. Whisk with a fork until smooth. Add hot water until combined; add the powdered sugar and cinnamon and mix until smooth.

2. Pour the chocolate mixture into a zip-top plastic bag; force the mixture to one corner and secure the top by twisting and holding in place. Cut a small piece off the corner of the bag and drizzle chocolate over the scones. Or spoon it right over the top, all gooey and messy. I’m too much of a perfectionist to do this. I need my deserts to be pretty before I devour them.

Scones are best eaten the same day, either warm or room temperature. And they’re really good if you eat them all in the same day. What? There are only 12 bize-sized portions. I totally didn’t eat them all the same day. It took 2 days for that. Hermit had one or two. I think.